Basically Programming for Lifting

Image result for clarence kennedy snatch

Disclaimer: Take this information with a grain of salt. I’ve written this blog not only to share this information with y’all but also to test my understanding of some recent research I’ve undertaken to grow my knowledge base in the weight/powerlifting world and increase the efficiency of my training. I am in no way qualified to coach this sport; I’m just a rookie who wants to do things right.

I also would like to clarify that though I may have built a slight reputation as a calisthenics athlete through my various interactions with Alex Jang, I’ve poured much more time in my latest 2-year fitness period into general bodybuilding exercises and powerlifting movements. I’ve just recently taken on the research of various training techniques because the renowned weightlifting youtuber Clarence Kenendy has piqued my interest in the two Olympic movements: the snatch and the clean and jerk. Though I’m currently in the drilling phase to perfect my technique regarding these two movements, I would soon like to adopt a structured training regimen for each of my compound exercises.

The Basics

Training can be divided into macrocycles, which are made up of mesocycles, which are made up of microcycles, as depicted by the diagram above. A basic macrocycle like the one in the picture can be made up of 13 weeks, split into 3 mesocycles. The first two mesocycles are each 4 weeks long, and the last one is 5 weeks long. Each of these weeks can represent a microcycle. By the end of this blog post, our goal is to be able to create a simplified microcycle by defining the reps, sets, and intensity of the weights you will be moving each week in order to successfully implement progressive overload and increase your one-rep max (1RM).

Relative Intensity

Before we begin structuring a basic program example, we need to define relative intensity, an important concept that we’ll center our example around.

While absolute intensity is defined simply as a percentage of your 1RM, relative intensity takes into account the number of reps you perform per set, along with the amount of weight you move to gauge how the entire set will physically feel to the lifter relative to their 1RM. The above rep max chart displays how many reps you can expect to perform with a certain percentage of your 1RM weight on the bar (AKA your projected rep max for that intensity). With that in mind, the formula to calculate your relative intensity is your absolute intensity divided by your projected rep max.

Relative Intensity = Absolute Intensity / Projected Rep Max

For example, if you plan to begin training sets of 6 reps with 70% of your max on the bar,

Relative Intensity = 70% / 85% ≈ 82.4%

This means that you will begin your training at a relative intensity of 82.4%. So why is number important? Most beginners would make the mistake of overlooking this calculation and choosing a linear progression with respect to their 1RM. Let’s say they begin training with 6 rep sets at 70%, and then move on to 6 reps at 75% the following week. Throughout this week, they’ll be training at a relative intensity of ~88.2%, so as expected they’ve actually bumped up their relative intensity. Feeling good on the third week, they may decide to move up in weight once more to 80% of their 1RM. Naturally, as a lifter approaches their maximum load, they drop the number of reps they perform per set. So for the third week, this imaginary lifter will decide to perform 4 reps per set at 80%. If we calculate their relative intensity now, it will be ~88.9%, just barely above last week’s.

The problem here is that our lifter has just made a huge jump of 5.8% in relative intensity between the first and second weeks, but just a tiny step of 0.7% between the second and third weeks of training. Statistically, most athletes agree that relative intensity should increase linearly by 5% or less each week.

Prilepin’s Chart

Image result for prilepin chart

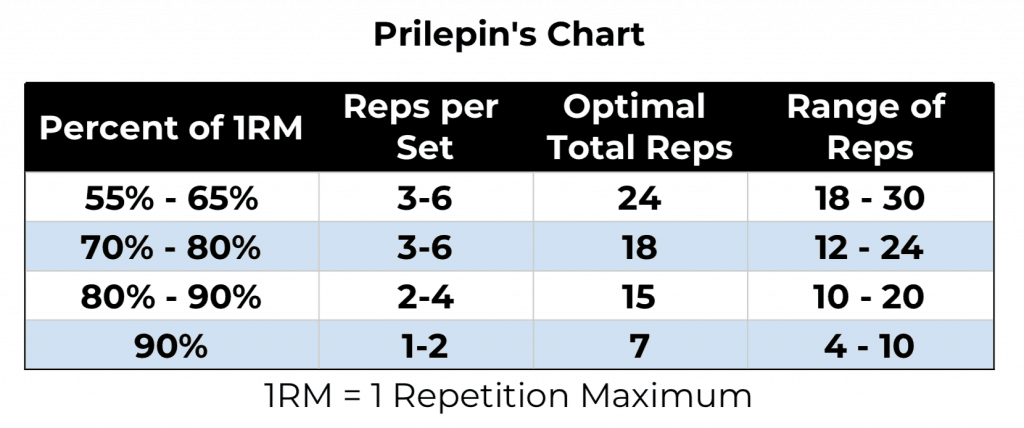
Your individual training sessions for a movement will be composed of warm up sets and working sets. Throughout your warm up sets, you’ll be working up from light weights, generally starting with just the 45 lb bar, then adding weights until you reach your working set intensity. It is generally recommended for athletes to begin training their working sets with at least 70% of their 1RM on the bar, but how can they figure out how many working sets and reps to do?

Here’s where Prilepin’s Chart comes in. Devised by A. S. Prilepin through numerous years of observing Soviet Olympic weightlifters, Prilepin’s Chart acts as guidelines to decide how many sets and reps you should do at a given absolute intensity. For example, if for the first week you want to work with 70% of your 1RM, we can observe the second row of Prilepin’s Chart. 70% is on the lower end of the 70%-80% range, which means in the last column we want to work with the maximum range of reps: 24. Thus, you should perform 6 reps per set, giving you a total of 4 sets. Conversely, if you were working with 80% of your 1RM, you would want to perform a total of 12 reps, so you would do 4 sets of 3 reps at 80%.

And there you have it, the basics of programming for lifting. These guidelines were originally intended for Olympic lift training (the snatch and the clean and jerk), but over the years they’ve carried over to powerlifting movements as well (bench, squat, deadlift). I’d say for any heavy compound movement utilizing a barbell, you can use these guidelines to work both smarter and harder.

Get Swole like Never Before


Image result for calisthenics on the ground
Full planche with black and white filter to look intense

As you’ve likely learned from Alex Jang’s numerous blog posts on this subject, the world of calisthenics revolves around bodyweight exercises. Whether you’re repping out push ups, sit ups, or burpees, your main focus is to master your own weight with perfect form and high mobility. 

Because of this, calisthenics brings one great appeal. There’s no need to buy expensive equipment or invest in a gym membership! After all, the ground is free, and if you’d like to get some pulling action into your workouts, you just need a quick visit to your local park.

That said, the ground has its limits when it comes to the difficulty of your dynamic exercises and the intensity of your isometric holds. The world of calisthenics has recognized this, so they’ve adopted a few crucial pieces of equipment you might want to pick up if you’d like to explore bodyweight exercise past its basics.

The Weight Vest

Image result for heria pro weight vest
Chris Heria wearing his weight vest

The easiest life hack to increase the intensity of your calisthenics workouts is putting on a weight vest. Because calisthenics centers around bodyweight exercises, it’s pretty obvious that the more you weigh, the harder each exercise will be. Weight vests are great because you can vary the amount of weight you put on, and they can be used with pretty much any calisthenics exercise.

Parallettes

Image result for handstand on parallettes
Handstand on parallettes

Parallettes are mini parallel bars. Some athletes prefer gripping these as opposed to keeping their hands flat on the floor while holding handstands, L-sits, planches, and similar isometrics. While performing these holds on the ground requires stable wrists and strong fingers, performing the same holds on parallettes will require dynamic wrists and target your grip strength. For example, while performing a handstand on the ground, to prevent yourself from falling forward you need to press your fingertips into the floor, but with parallettes, you need to push forward or back with your wrists.

Rings

Top position of the ring dip

These are the secret behind the title of this blog post! Rings target muscles you never knew you had. Just try holding yourself above the rings with your arms fully extended like the guy in the picture and you’ll find yourself shaking like you’ve just done a hundred push-ups and you’re going for one more. Rings are inherently unstable, so to perform any exercise using them will require you to squeeze your body and activate your numerous small stabilizer muscles that are rarely hit by other movements. The constant tension generated by ring exercises will do wonders for your involved musculature.

Chin-Ups on Rings

The ring chin-up

The most basic ring exercise is of course the chin-up. As the prerequisite for learning this move, you should definitely be able to at least five perfect chin-ups on a straight bar in a row. Now, ring chin-ups are quite easy if you do them incorrectly, so you won’t build much muscle with these unless you maintain perfect form throughout every rep. Remember, perfect form and full range of motion are key to achieving progress. Anything less than that and your reps are nothing better than white lies.

So how do you do a perfect ring chin-up? Step one is to focus on starting from the correct position. Mimic the guy in the first picture: keep your arms and back fully straightened, shrug your shoulders, and turn your wrists into a neutral grip. After that, you’ll need to pull into the top position as shown in the second picture. On the way up, you’ll need to focus on three things: pull by flexing your back and biceps, maintain a tight grip while rotating your wrists into chin-up position, and squeeze your forearms to get your chest as close to the rings as possible. To maximize the activation of your muscles, hold the top position for at least three seconds, then take three more seconds on the way down, maintaining tension throughout your body the entire time. Make sure you extend fully into the starting position before beginning your next rep!

Ring Dips

The ring dip

Ring dips are harder than they look, and they look pretty damn hard, but they’re also the second basic ring exercise you need to master before moving on to intermediate or advanced movements. As a prerequisite for attempting this move, you should be able to do at least 15 straight bar dips and 20 parallel bar dips comfortably. Also, make sure you can hold the top position as shown in the first picture!

To perform a perfect ring dip, just mimic the guy in these two pictures again. Throughout the entire movement, your entire chest and core will need to be extremely tense in order to maintain stability and not fall off the rings. At the bottom of the dip, you’ll need a 90 degree bend in your elbows and a neutral grip with your forearms perpendicular to the ground. You’ll need to lean forward as you go down to achieve this position; this will put the majority of the load on your triceps, which is the main focus of the dip. As for the top position, push down with all your might; you’ll want to be as tall as possible. Most importantly, lock your elbows and rotate your wrists outward; this will ensure full contraction of your triceps. Master the ring dip and you’ll achieve your swole goals in no time!

There are trillions of other exercises you can do on rings. Pretty much every move you can perform on the ground, a pull-up bar, or parallel bars can be done on rings as an advanced progression. You’ve got your ring muscle-ups, handstands, planche variations, lever variations, and so on. But for a beginner like you or me, who has just picked up their first pair of gymnastic rings from Amazon, chin-ups and dips are fundamentals to master, an essential milestone to reach before you even go so far as to attempt the advanced calisthenics moves you’ll need to flex on the kids at your local park.

Maltese planche on rings. How is that even possible?